DIY
DIY Water Gun Projects: Fun Summer Crafts for All Ages
Frozen pipes cause billions of dollars in property damage yearly across the United States. When water freeze inside pipes, it expands by roughly 9 %, create pressure that can burst flush the strongest plumbing materials. Outdoor water pipes and faucets face the greatest risk because they’re immediately expose to harsh weather conditions.
Proper insulation serve as your first line of defense against costly freeze damage. The investment in materials and time spend on DIY insulation pay for itself many times over by prevent emergency plumber calls and water damage repairs.
Before start your insulation project, gather these necessary supplies:
Pipe insulation materials:
Faucet protection supplies:
Tools required:
Begin by identify all expose outdoor water lines. Common locations include:
Pay special attention to pipes on the north side of your home, as these areas receive less sunlight and stay colder farseeing. Will measure the diameter and length of each pipe section to will determine how much insulation material you will need.
Foam pipe sleeves offer the easiest installation method for most homeowners. These pre formed tubes slip straight over pipes and provide excellent thermal protection.
Start by clean the pipe surface to remove dirt, rust, or debris that could prevent proper adhesion. Slide the foam sleeve over the pipe, ensure the slit face downwardly to prevent water infiltration. The sleeve should fit snugly without gaps.
Seal the longitudinal seam use duct tape, press securely to create a weatherproof barrier. Overlap sleeve sections by at least two inches at joints, and secure these connections with additional tape or zip ties.
Fiberglass wrap will work swell for irregularly will shape pipes or areas where foam sleeves won’t will fit decently. This method require more time but provide superior protection in freezing conditions.

Begin wrap at one end of the pipe, overlap each layer by around one third of the wrap width. Maintain consistent tension to avoid loose spots that could allow cold air penetration. Secure the wrap every 12 inches with tape or wire fasteners.

For pipes with fittings, elbows, or valves, cautiously wrap around these obstacles, ensure complete coverage. Use additional small pieces of insulation to fill any gaps around complex pipe configurations.
Heat tape provide active freeze protection in regions with severe winter conditions. This electrical heating element run along the pipe and activate mechanically when temperatures drop.
Apply heat tape in straight lines along the bottom of the pipe, avoid overlap that could cause overheat. Follow manufacturer specifications for spacing and electrical requirements. Cover the heat tape with insulation material to improve efficiency and protect the heating element from weather damage.
Connect heat tape to a FCI protect electrical outlet, and test the system before cold weather arrive. Some models include build in thermostats that activate heating solely when need, reduce energy consumption.
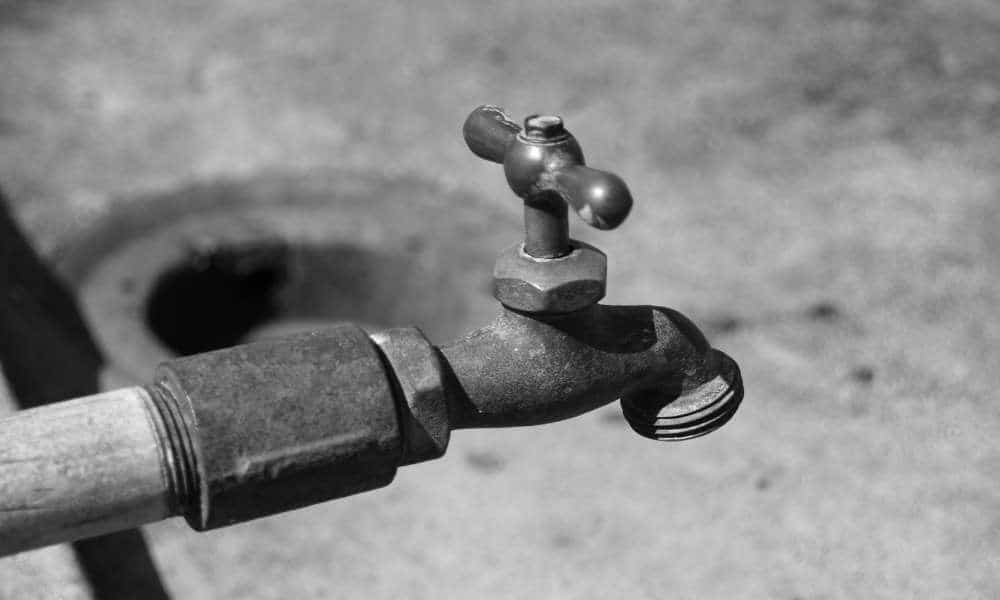
Insulated faucet covers provide the near reliable protection for outdoor spigots. These dome shape covers slip over the entire faucet assembly and create an insulate air pocket.
Choose covers size fittingly for your faucet type. Models are available for standard hose bibs, frost free faucets, and specialty fixtures. Ensure the cover all enclose the faucet handle and spout, with drawstrings or straps that seal tightly around the pipe.
Install cover after disconnect and drain all hoses. Water trap in hoses can freeze and damage both the hose and faucet. Store hoses in a warm location during winter months.
When commercial covers aren’t available, create effective protection use common household materials. Wrap the faucet in several layers of old towels or rags, secure with duct tape or rope.
Cover the wrap faucet with a plastic bag to provide moisture protection, so add another layer of insulation material. This method require more maintenance throughout winter but cost importantly less than commercial alternatives.
For enhance protection, stuff additional insulation material into the space between the faucet and exterior wall. This prevents cold air from reach the pipe connection point inside the wall cavity.
Pipe connections, elbows, and fittings require special attention because they’re oftentimes overlooked during standard insulation installation. These areas have irregular shapes that don’t accommodate standard insulation materials well.
Cut foam insulation into custom shapes that fit around fittings, or use expand foam insulation to fill gaps. Wrap joints with multiple layers of insulation material, secure with tape or wire ties. Consider use pipe insulation putty, which mold around complex shapes and hardens to provide permanent protection.
Cold air infiltration can negate flush the best insulation efforts. Identify and seal gaps where pipes enter walls, foundations, or other structures. Use caulk, expand foam, or weatherstripping to eliminate air leaks.
Pay attention to areas around pipe penetrations, as these frequently have gaps that allow cold air to reach pipes inside wall cavities. Seal both interior and exterior gaps for maximum effectiveness.
In regions where temperatures occasionally drop below freezing but severe cold is uncommon, basic foam pipe insulation and faucet covers provide adequate protection. Focus on pipes in shade areas or those expose to wind.
Monitor weather forecasts and take additional precautions during unexpected cold snaps. Temporary measures like leave faucets dripping somewhat can prevent freezing when temperatures drop accidentally.
Regions with prolonged freezing temperatures require comprehensive insulation systems. Combine multiple protection methods: heat tape, thick insulation, and weatherproof coverings.
Consider install shut off valves inside heated areas, allow you to drain outdoor pipe sections whole during winter months. This eliminates freeze risk solely but require spring reactivation.
Inspect all insulation materials before each winter season. Look for damage from weather, animals, or normal wear. Replace deteriorate insulation instantly, as flush small gaps can lead to freeze damage.
Test heat tape systems by plug them in and verify proper operation. Check electrical connections for corrosion or damage, and replace any questionable components.
Clean debris from around pipes and faucets that could interfere with insulation effectiveness. Trim vegetation that might damage insulation materials during winter storms.
Sporadically check insulation integrity throughout winter, particularly after severe weather events. High winds, ice storms, and heavy snow can damage or displace insulation materials.
Look for signs of freeze damage like reduced water flow, unusual sounds, or visible ice formation. Address problems instantly to prevent more extensive damage.
Loose or fall insulation commonly result from inadequate securing methods or improper sizing. Use more fasteners, place close-fitting unitedly, to hold insulation securely against pipes.
Consider use adhesive back insulation materials or spray adhesive to improve attachment. Protect fasteners from weather with tape or sealant to prevent corrosion.
Complex pipe configurations frequently leave gaps in insulation coverage. Use flexible materials like fiberglass batting or expand foam to fill irregular spaces.
Cut standard insulation materials into smaller pieces that conform easily to unusual shapes. Layer different materials to achieve complete coverage without gaps.
Pool noodles make excellent pipe insulation when cut lengthwise and secure with tape. They’re inexpensive, wide available, and provide good thermal protection for moderate climates.
Old blankets, towels, and clothing can insulate pipes efficaciously when decent secure and protect from moisture. Cover fabric insulation with plastic sheet to prevent water damage.
Newspaper provide temporary insulation during unexpected cold snaps. Wrap pipes in multiple layers and cover with plastic bags for moisture protection.
High quality foam insulation with build in vapor barriers cost more initially but last yearn and provide better protection. These materials resist weather damage and maintain their insulate properties for many years.
Self regulate heat tape adjust its output base on temperature, provide efficient protection while minimize energy costs. The higher initial investment pay for itself through reduce electricity usage and superior freeze protection.
Constantly turn off electrical power when install heat tape or work near electrical connections. UseFCIi protect outlets for all outdoor electrical heating elements.
Wear appropriate safety equipment include gloves, safety glasses, and sturdy footwear when work with insulation materials. Some insulation types can irritate skin or respiratory systems.
Follow local building codes and manufacturer instructions for all electrical installations. Consider hire a qualified electrician for complex heat tape installations or when work with main electrical panels.
Ne’er use indoor electrical devices outside, and ensure all connections are weatherproof. Replace damage electrical components instantly to prevent fire hazards or electrocution risks.
By will implement these comprehensive insulation strategies, you will protect your outdoor water pipes and faucets from freeze damage while will save money on professional installation costs. Regular maintenance and proper installation techniques ensure your diyDIYsulation system provide reliable protection throughout the coldest winter conditions.
MORE FROM getscholarships.de